There are several powerful reporting tools available for Microsoft Dynamics GP. Microsoft Excel Report Builder is one that’s particularly useful.
Associated with the SmartList Builder application, it enables the user to create custom Report Definitions in the form of List and Pivot Tables that may be published as an Excel Report for users to access current Microsoft Dynamics GP data from your system.
Once the report is published in Excel, the users who have access to the report can refresh the data to update the report with current information.
In this two-part series, we’ll first take a look at how to access Microsoft Excel Report to create, modify, and publish custom reports. With the power to do this, you’ll be able to help your organization manage and glean insight from data like never before.
To access Microsoft Excel Report Builder for creating custom reports:
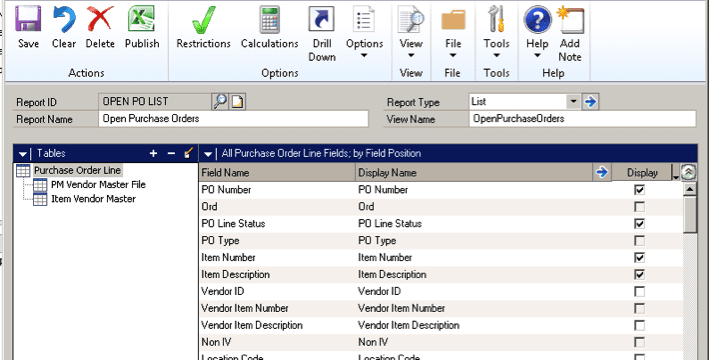
- Select Microsoft Dynamics GP – Tools – SmartList Builder – Excel Report Builder – Excel Report Builder

To Create a new report:
- Enter the Report ID
- Enter the Report Name
- Select the Report Type (List or Pivot Table)
- Enter the View Name, which may not include spaces or special characters
To Modify an existing report:
- Select the Report ID
Add the Primary table to the report:
- Select the primary table by clicking the + next to tables
- Select the table type
- Microsoft Dynamics GP Table – To pull from tables associated with the GP application
- SQL Server Table – To pull from SQL tables and views from GP Companies and the Dynamics database added to SmartList Builder
- Add SQL script – Allows the user to pull data using a script
- Select the Product the table belongs to
- Select the Series the table belongs to
- Select the Table
Add additional linked tables:
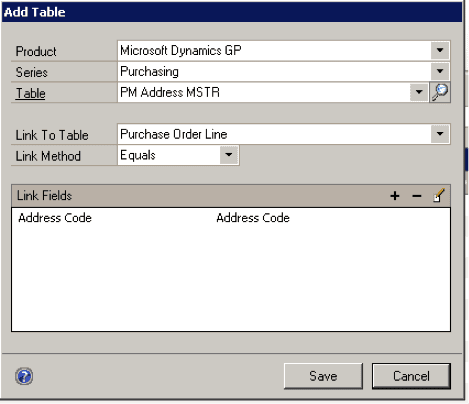
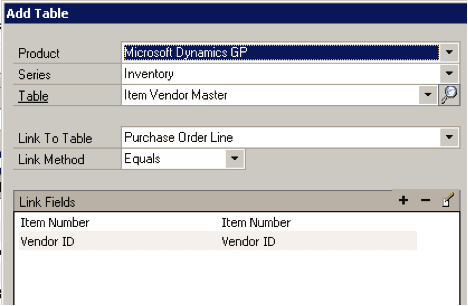
- If Required, select additional table based on the report requirements using the + next to tables
- Select the table type
- Microsoft Dynamics GP Table – To pull from tables associated with the GP application
- SQL Server Table – To pull from SQL tables and views from GP Companies and the Dynamics database added to SmartList Builder
- Add SQL script – Allows the user to pull data using a script
- Select the Product the table belongs to
- Select the Series the table belongs to
- Select the Table
- Select the Link to Table that the new table will have a relationship with
- Select the linkage type (Equals or Left Outer)
- Select the + next to link to select the From and To linkage

To Remove a link from the report:
- Select the table to remove
- Select the – next to Tables
To Modify the Link relationship between tables:
- Select the table to change the link
- Select the Notepad next to the Table –
- Modify the link by using the + and – next to the Link Fields

- Add the desired fields to the Report
- Select the Table on the left to view the available fields on the right
- Select the Fields you would like to view on the report
To Save a Report, click the Save button on the Toolbar
To Clear the Screen and start again, click the Clear button on the Toolbar
To Delete the Report, click the Delete button on the Toolbar
To Publish a Report to Excel:
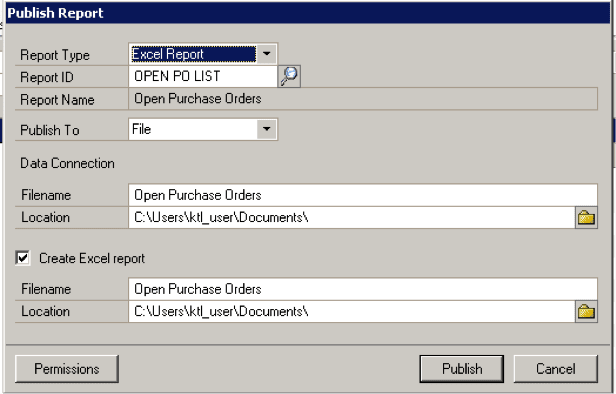
- Click the Publish button on the Toolbar

- Select the Report Type of Excel
- Enter the Filename and Location to store the Data Connection
- Select the Create Excel report checkbox
- Enter the Filename and Location to store the Excel Report
- Select the Permissions button to assign security to GP Roles for this report
- Click Ok
- Click Publish
Congratulations – you’ve created a custom report! You’re on your way to managing and using your data in more effective ways than ever before.
Have any questions on the process? Let us know. At KTL Solutions, our qualified experts are always happy to help.


